

Ever looked at a Photoshoot Poses of yourself and thought, Why do I look so awkward? You’re not alone! The secret to a great photo isn’t just about having a good camera or perfect lighting. It is about how you pose.
A well-executed pose can turn an ordinary picture into a stunning one, making you look confident, natural, and photogenic. But here is the catch: posing isn’t about memorizing stiff, overused positions. It is about movement, expression, and creating shapes that complement your body. Whether you are a model, an influencer, a couple taking romantic shots, or just someone who wants to look better in pictures, mastering the proper poses can change the game.
The Basics of a Perfect Pose
Striking the perfect pose isn’t about standing still and forcing a smile—it’s about flow, balance, and natural movement. The best photos capture energy and confidence, not stiffness. Here’s how you can master the basics of posing in a way that looks effortless and authentic.
Think of Your Body as a Story
Every pose tells a story. Are you aiming for confidence, relaxation, or playfulness? Before stepping in front of the camera, decide what you want the pose to express. A slight tilt of the head can show curiosity, while an open stance exudes confidence.
The Invisible ‘S’ Rule
Great poses follow a natural S-curve, which makes the body look relaxed and elegant. Whether standing or sitting, avoid straight, rigid lines. Shift your weight, let your body curve naturally, and create a subtle flow in your posture.
Tension vs. Relaxation: Finding the Sweet Spot
Stay Engaged, Not Stiff
Good posture starts with a strong core, but don’t overdo it. Stand tall, keep your shoulders loose, and let your arms rest naturally. A slight bend in your elbows or knees adds movement and keeps things looking effortless.
Your Face Needs to Relax, Too
A forced smile or tense jaw can ruin even the best pose. Try exhaling slowly, gently parting your lips, or thinking of something that makes you happy. Natural expressions always win over stiff, over-rehearsed ones.
Micro Movements Make a Big Difference
If you feel stuck, add tiny movements, shift your weight, play with your hair, or turn your head slightly. These minor tweaks make your pose feel more alive and less robotic.
Confidence is the Magic Ingredient
No matter how well you pose, if you don’t feel good, it’ll show. The best photos come from people who own the moment. So, take a breath, relax, and let your energy shine through!
Micro Movements for a Natural Look
Instead of holding a pose like a statue, add micro-movements:
- Slightly shift your weight between steps.
- Adjust your fingers instead of keeping them stiff.
- Move your head slightly instead of keeping it frozen.
Perfecting the Posture: Stand Tall, Look Confident
Ever wondered why some people look effortlessly photogenic? It is not just their outfit or the lighting; it is their posture. The way you hold yourself can make or break a photo. Good posture doesn’t mean standing like a soldier; it’s about creating a natural, confident stance that flatters your body.
Stand Tall, But Stay Loose
The key is to lengthen your body without looking stiff. Imagine a string pulling you up from the top of your head, but keep your shoulders relaxed. A slightly lifted chin and open chest instantly make you look more poised and self-assured.
Shift Your Weight for a Natural Look
Standing straight on can make you look flat or boxy in photos. Instead, shift your weight onto one leg to create subtle curves. This adds dimension to your pose and keeps you from looking too rigid.
Mind Your Hands and Arms
Ever find yourself awkwardly placing your hands with no idea what to do? The trick is to avoid pressing them flat against your body. Keep a slight bend in your elbows, rest your hands on your hip in your pockets, or lightly touch your face or hair for a more natural look.
Relax, But Stay Engaged
Slouching makes you look tired, but overposing looks forced. Find balance, engage your core for structure, keep your movements light, and breathe naturally. When you feel comfortable in your stance, it will show in the photo.
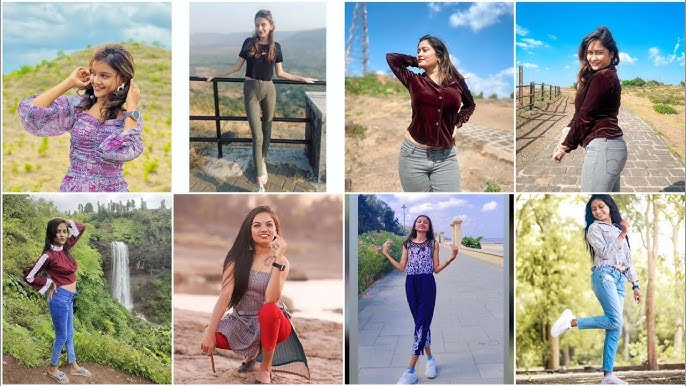
Poses for Different Types of Photoshoots
Solo Poses
- Angle Smartly: Turn slightly and shift weight for a relaxed look.
- Move Naturally: Adjust your outfit, touch your hair, or take a step.
- Use Hands Purposefully: Pockets, props, or subtle gestures.
- Relax Face: Breathe, think happy thoughts for natural expression.
Couple Poses
- Close the Gap: Stand close, hold hands, or lean in.
- Create Moments: Whisper, twirl, or walk together.
- Play with Levels: One sits, and one leans in for variety.
- Express Naturally: Soft for romance, laughter for fun shots.
Group Poses
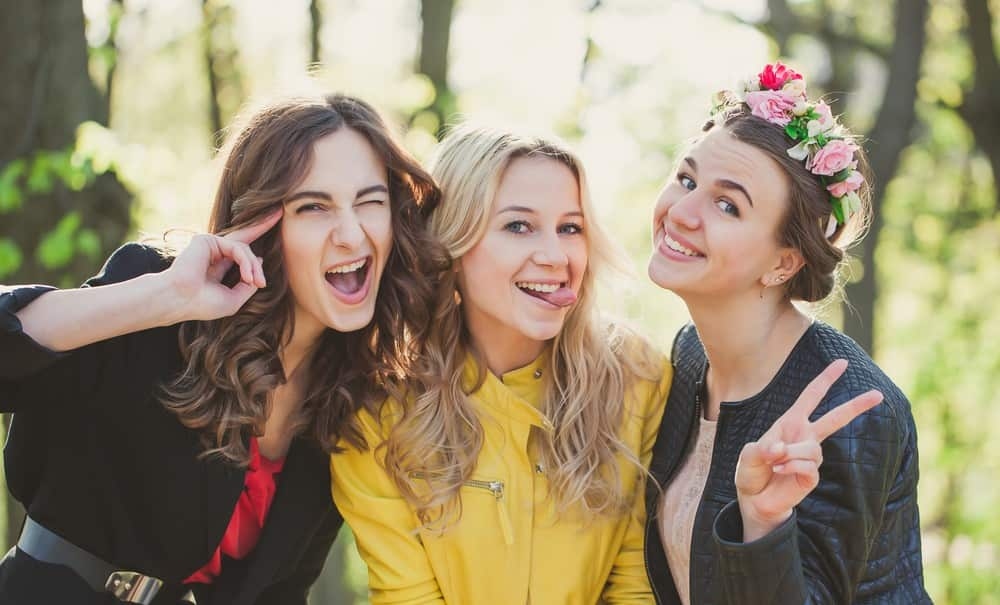
- Avoid Straight Lines: Mix heights—some sitting, some standing.
- Encourage Interaction: Laugh, talk, or engage naturally.
- Add Motion: Walk, jump, or create a fun group action.
- Use the Surroundings: Sit on stairs and lean against walls.
Action Poses
- Start Moving: Walk, spin, shift weight.
- Engage Hands: Adjust clothes, fix hair, hold an accessory.
- Let Go of Perfection: Spontaneous shots capture the best energy.
Candid Poses

- Do Something: Sip coffee, adjust sunglasses, look away.
- Forget the Camera: Think of something funny; let expressions flow.
- Capture Mid-Movement: Walk, turn, and adjust clothes casually.
Your Eyes & Smile: The Silent Game Changers
A pose can shape a photo, but your eyes and smile bring it to life. A lifeless stare or a forced grin can make even the best pose feel dull. The secret? Stop performing. Start feeling.
The Eyes: Speak Without Words
A blank gaze is forgettable. A thoughtful gaze is powerful.
- Think Beyond the Camera Imagine you are sharing a secret, reliving a memory, or thinking of something that excites you. Your eyes will instantly show depth.
- Soft Focus, Big Impact: A slight squint (not too much, just a hint) prevents the “deer-in-the-headlights” look and adds warmth.
- Master the Side Glance Looking slightly away can create mystery, curiosity, and a candid effect that feels effortless.
- Breathe Through Your Eyes Right before the shot, take a deep breath and slowly exhale. This will remove tension and soften your gaze naturally.
The Smile: Make It Feel Real
A forced smile is a forgotten smile. A real one lasts forever.
- Ditch the Fake Grin Instead of posing, think of a happy thought or a funny moment. The difference is instant.
- Smile in Layers:
- A smirk adds confidence and charm.
- A half-smile feels subtle and relaxed.
- A complete smile radiates warmth and joy.
- A laughing smile is the most natural way to let it happen.
- Let Your Eyes Join In. A genuine smile spreads to the eyes. If your eyes stay neutral, your smile might not feel entirely authentic.
- Keep It Moving A frozen smile feels stiff. Slightly shift your head or change expressions between shots for a more natural effect.
The Secret Ingredient: Feeling Over Posing
The best photos are not about looking perfect; they are about feeling something.
- Reset Before the Shot: Close your eyes, inhale deeply, exhale slowly, then open them. This instantly relaxes your face.
- Minor Adjustments, Big Difference: A slight head tilt, a relaxed shoulder, or a subtle smirk can add more character than a stiff pose.
- Forget the Camera Exists. Think of it as a person, not a machine. The more natural you feel, the more effortless your expression will be.
How Expression and Confidence Create Stunning Photos
A technically perfect pose means nothing if your face tells a different story. Expression and confidence make a photo feel real and turn a simple image into something powerful. Instead of just posing, you need to connect with the camera and own your space.
Expression: The Unspoken Language
A camera captures more than just a face; it captures emotion. If there is no expression, the image feels empty. The trick is to stop performing and start feeling better.
- Your Face Sets the Mood Whether it is playful, mysterious, or intense, your expression should match the energy of the shot.
- Let Your Eyes Do the Talking: A relaxed gaze, a soft squint, or a sharp focus can completely change the emotion of the photo.
- Ditch the “Posed” Look Instead of thinking about how you should look, think about how you should feel. The difference is night and day.
- Micro-Movements Add Magic A slight shift in your lips, a raised eyebrow, or a slow exhale can add depth and make your expression come alive.t
The Perfect Combo: Expression + Confidence
Expression without confidence can feel uncertain. Confidence without expression can feel empty. But when they come together, you get photos that feel alive.
- A bold pose with a soft smile can create contrast.
- A direct gaze with a relaxed posture can feel effortless.
- A playful smirk with an open stance can add charisma.
The key is to let go of self-doubt and trust that the best version of you is already there, just waiting to be captured.
Using Props and Natural Movements
Why Still Poses Fall Flat
- Stiff poses look staged and unnatural.
- The best shots capture motion and emotion.
- Small actions make a significant impact.
The Easiest Fix for Awkward Hands
- Hold something natural – Coffee cup, book, phone.
- Use wearable props – Sunglasses, hats, scarves.
- Interact, don’t just hold – Sip, flip, adjust.
Natural Movements for Dynamic Shots
- Take a step – Walking shots feel effortless.
- Turn slightly – A head tilt or body shift adds life.
- Adjust something – Fix your sleeve, tuck your hair.
- React naturally – Laugh, look away, play with the moment.
Combine Props + Motion for Magic
- Walk while adjusting sunglasses – Effortlessly cool.
- Flip a book page mid-shot – Engaging and candid.
- Play with fabric while spinning – Adds energy and flow.
- Toss a jacket over your shoulder – Confident and stylish.
Forget the Pose Feel the Moment
- Stop thinking about looking good.
- Start moving, feeling, and interacting.
- Let the camera capture the real you
Lighting and Background Considerations
A perfect pose means nothing without the proper lighting and background. Instead of just using what’s available, shape your environment for a professional, effortless look.
Step 1: Control the Light, Don’t Let It Control You
- Move. Do not Settle Shift positions until the light flatters your face.
- Angle Matters Side lighting adds depth, while front lighting can flatten features.
- Soft Light Wins: Use indirect light (shade, window light) for smooth skin tones.
- Golden Hour Hack Shoot at sunrise/sunset for a warm, natural glow.
- Bounce Light Back: Use walls, reflective surfaces, or even a light-colored outfit to soften shadows.
Step 2: Treat the Background Like Part of the Story
- Simplify the Scene A cluttered background distracts; find a clean, balanced frame.
- Depth Creates Drama: Step away from the background for a natural blur effect.
- Use Leading Lines, Sidewalks, doorways, or railings to guide focus to you.
- Contrast or Blend: Choose a background that makes you stand out or complements your look.
- Frame Yourself: Position yourself between objects (arches, trees, windows) for a natural spotlight effect.
Step 3: Light + Background = The Perfect Shot
Pair the proper lighting with an intentional background for next-level photos:
- Golden Hour + Open Sky = Dreamy, cinematic glow.
- Window Light + Neutral Wall = Soft, editorial style.
- Side Lighting + Textured Surface = High-contrast, bold look.
- Neon Lights + Urban Street = Modern, moody vibe.
Frequently Asked Questions
How do I instantly improve lighting in my photos?
Find soft, natural light by standing near a window indoors or shooting during golden hour outdoors. If the light is too harsh, move into the shade or use a white surface to reflect it onto your face.
Why do my photos look dull even in good lighting?
It’s not just about brightness; it’s about direction. Side lighting creates depth, while flat front lighting can make a photo look lifeless. Try angling the light to add natural highlights and shadows for a more dynamic effect.
What should I do if my background is ruining my photo?
Change your angle or move a few steps forward to minimize distractions. A simple, uncluttered background enhances the subject, while a busy one can take attention away.
How do I make my photos look more natural?
Use movement instead of stiff posing. Slightly shift your weight, adjust your hair, or turn your head mid-action. The proper lighting and a well-chosen background will do the rest.
Can I get a professional-looking background anywhere?
Yes! Look for elements that frame you, like archways, trees, or window reflections. Step away from walls to create depth, and if the scene is too chaotic, use portrait mode to blur the background.
What’s the most significant mistake people make with lighting?
Ignoring direction and quality. Overhead lighting creates unflattering shadows, while backlighting can make you look like a silhouette if it is not balanced. Always test different angles before settling on a pose.
Conclusion
Great photos are not just about posing; they are about using light and space to your advantage. Find soft, natural light, choose a background that enhances rather than distracts, and add subtle movement for a natural feel. Whether you’re using a phone or a pro camera, understanding your surroundings is the real secret to standout photos.